What if our hearing and visions were connected? Imagine that you could see differently according to the sounds that come to your ears. Sounds crazy, right? Well, it actually exists and it is called chromesthesia.
In this article, we will recreate the chromesthesia phenomenon with Unity3D combining two fields that generally don’t come together: audio analysis and shaders.
Are you ready to “see” sounds? 🔈 👀
A hint of audio theory
Sounds that reach our ears vibrate in a certain way, called frequency which is expressed in hertz (Hz). The hearing range for humans, as known as the acoustic range, is approximately 20 Hz to 20,000 Hz. Sounds outside this range are infrasounds (below) and ultrasounds (above).
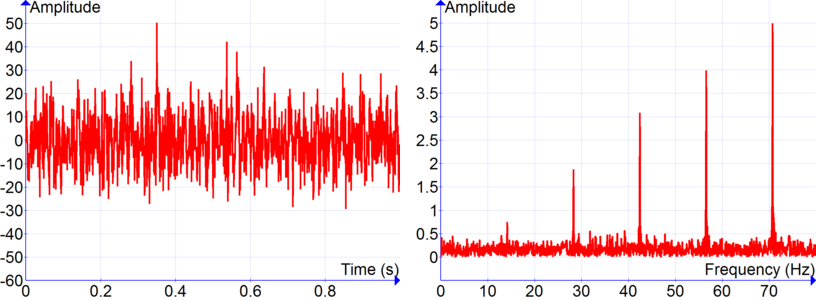
After capturing a sound with a recording device, we can figure out that the corresponding audio signal is not clean, and it is kind of complicated to determine which frequencies compose it. Thanks to signal processing and the Fast Fourier Transform (FFT) algorithm, it is possible to identify the main frequencies of a sound from the other ones (ambient noise or interferences).
Building the app with Unity
Do you remember my previous article? We will re-use the main elements to build our new app. We need the following Unity objects: a Microphone, an AudioSource, a Mixer, a Shader, a Camera, a Plane, and a WebCamTexture.
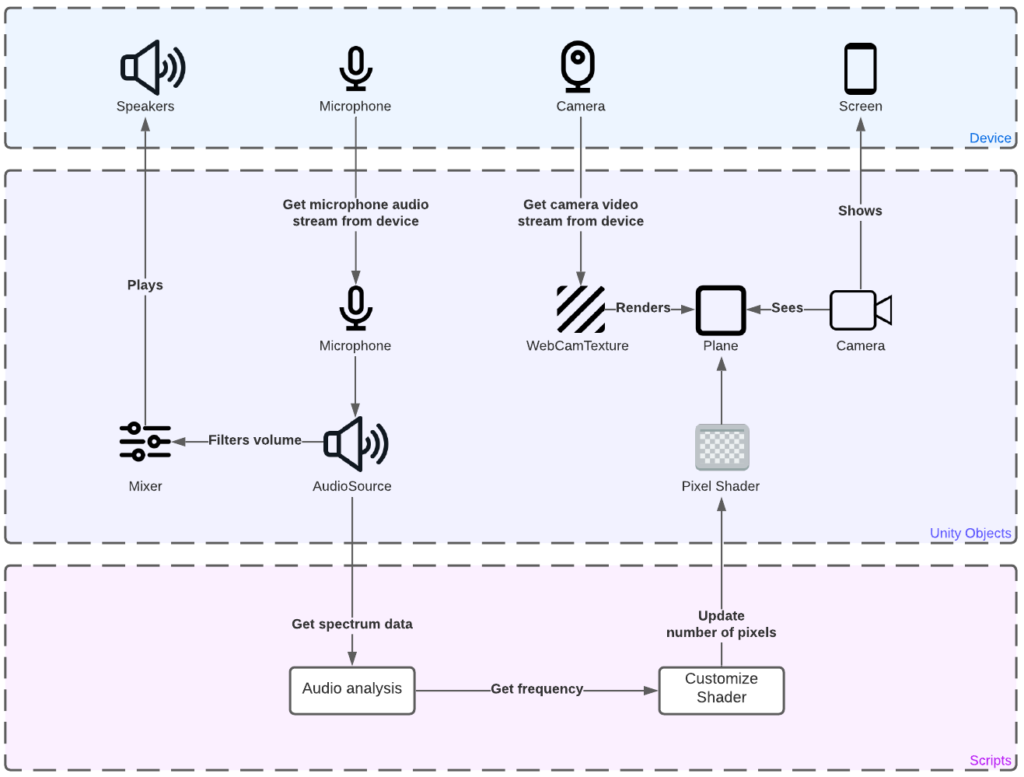
The Microphone 🎤
First, we look for an available Microphone on the device where the Unity app is running:
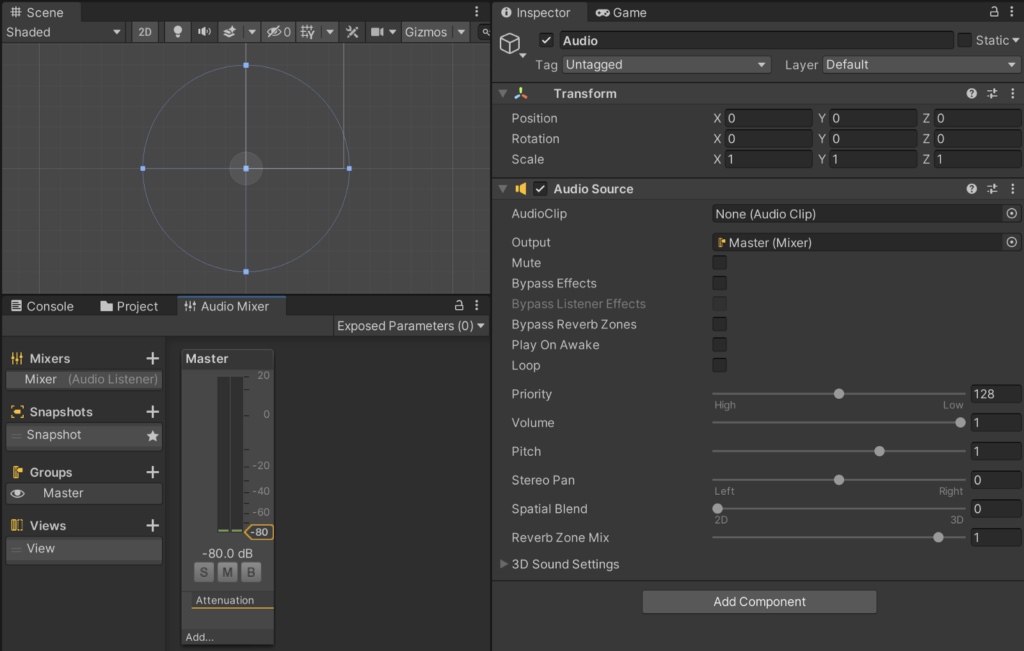
The AudioSource and the Mixer 🔈
We have the Microphone, then we apply the audio stream to an AudioSource object and finally turn it on:
Now, the problem is: if the AudioSource plays, it will create an infinite loop between the Microphone and the speakers, and the result will be an awful reverberation. So we attach an Audio Mixer with a volume equal to 0 (=-80 dB) to the AudioSource to silence it:
Audio Analysis with Unity3D 📈
According to Unity documentation, the GetSpectrumData function applies the FFT algorithm to the current sound played by an AudioSource and returns a spectrum array of samples. Each sample represents a range of frequencies and its related amplitude value. This range can be calculated in the following way:
Note that:
- The sample rate is defined by the outputSampleRate function (generally 48 kHz)
- Signal processing needs a sample rate twice the human hearing range to perform the FFT algorithm, so we divide this sample rate by 2
- In this article, we will deal with musical pitches, so we use the maximum allowed spectrum size (8192) to get smaller samples and more precise frequencies.
➡️ Calculating with the previous values gives us 48,000 / 2 / 8192 ≈ 2.93 Hz per sample.
Let’s initialize our variables:
Note: I found that samples with an amplitude below 0.01 are irrelevant (noise)
Now we create a Peak class to store data from the spectrum:
We retrieve the data and store it in a Peak list:
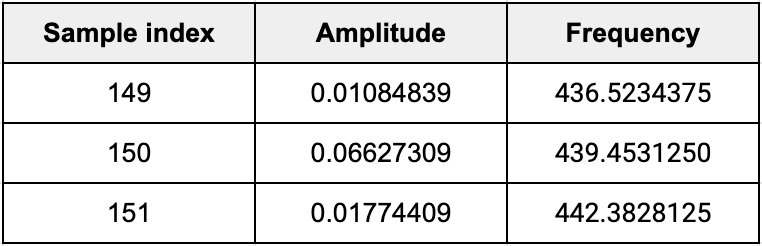
After playing an A4 pitch on my wife’s piano, I obtain 3 peaks with the following values:
Graphical representation:
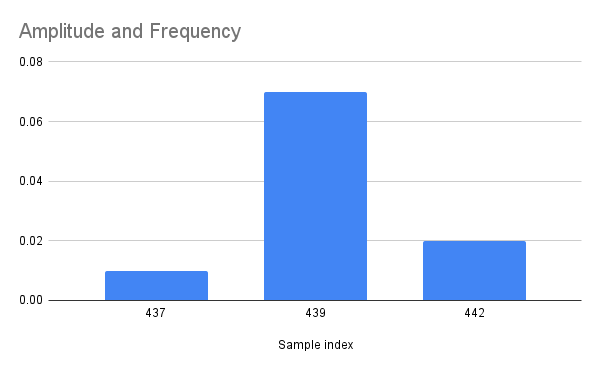
It looks good! If we interpolate those values, we obtain 439.7 Hz which is pretty close to 440 Hz, the frequency of the A4 pitch.
The Shader 🖼
We will create a shader with a cool pixelated effect. To achieve it, we divide the texture into blocks of identical size, each pixel of a block takes the value of its center pixel.
Then we update our shader with the number of blocks that the image or texture will contain according to the interpolated frequency previously calculated:
The Camera 🎥
We will use a generic Unity Camera. Before starting with the device camera implementation, let’s try the pixel shader we have just created with a simple picture (SpriteRenderer).
It works! Let’s compare our result with Adobe’s Mosaic filter:
Well, it’s a pretty good result! Our result is a little bit rougher than the Mosaic filter.
The Plane
A default Plane in Unity is usually used as a floor component, so we play with the rotation parameters to place the Plane in front of the Camera.
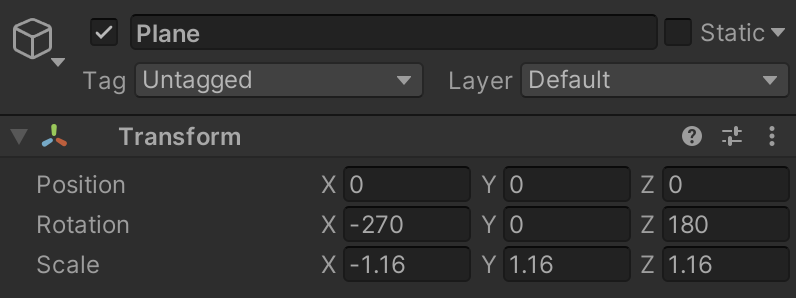
Note: if you are going to work with a webcam or a frontal device camera, you will need to invert the x scale.
The WebCamTexture
The WebCamTexture is a special texture that allows capturing a live video from a device camera (or from a webcam if you are working with a laptop) and rendering it in Unity space. we create a new WebCamTexture and we apply it to the Plane.
Final result
After building the application on an old LG phone, here is the final result on video:
Closing thoughts
This article showed you how to make a very simple Unity app involving 3D objects, shaders, a device camera, and a microphone. We also had the opportunity to learn about frequencies and audio analysis in general.
Every code of this article has been tested using Unity 2020.3.17 and Visual Studio Community 2019. The mobile device I used to run the Unity app is an LG Magna with Android Lollipop. My wife’s piano is a Yamaha Clavinova CLP-645.
You can download the full Chromesthesia Unity Package specially designed for this article.
A special thanks to Gianca Chavest for helping me edit the video and designing the awesome illustration.