This article was initially published on my Medium Page.
Some years ago (pre-pandemic times), a client of mine called me very excited, he had a big project in mind and needed my services. He told me: “Alex, I want to make a SuitePad for the Latam market”. Wait, what?
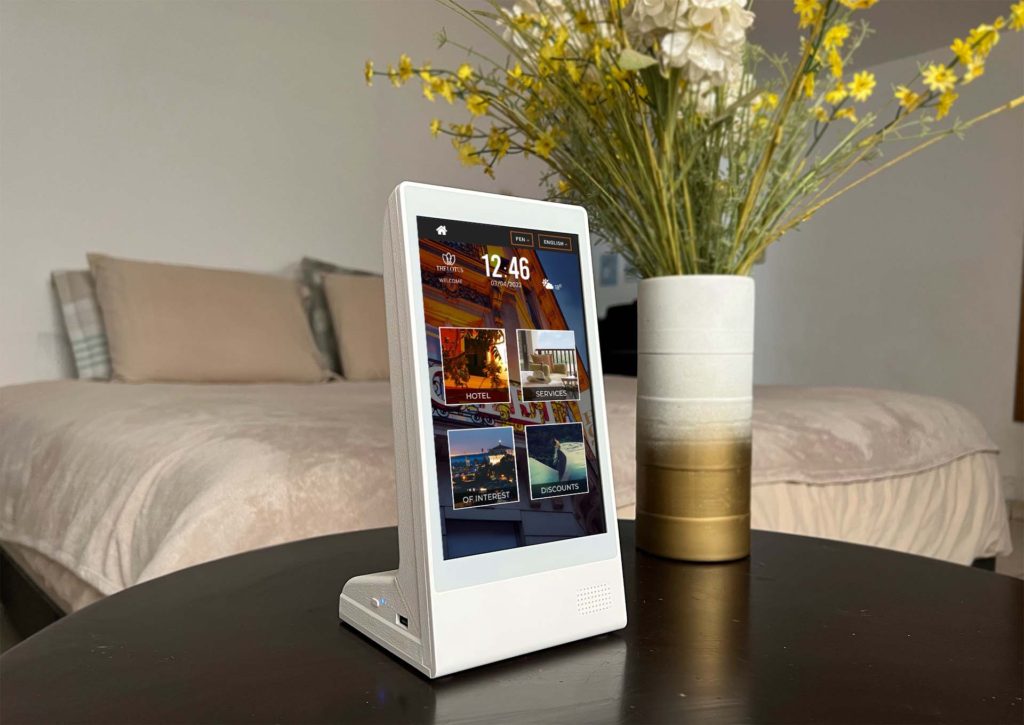
If you have traveled and rested in luxury hotels or resorts, you should have used the multifunctional pad or tablet in your hotel room. This device mainly allows visualizing information about the hotel, phone numbers, menus, prices, and events, and sometimes allows communication with room service or reception. A great example of this type of product is SuitePad.
And I finally did it! Here is an overview of the final app:
In this article, I will explain how to build this kind of platform using Unity3D for the visual interface and Amazon Web Services (AWS) for the server-side architecture. This article will focus on how to configure the services and establish communication between them. As a matter of confidentiality, I will only show fragments of code of the principal functionalities of the platform.
Requirements
My client claims that he already had bought some Android pads and he needed me to build the platform. The first delivery would be very basic: it only would load hotel information from the server and show it on the pad. No communication with room service, nor other functionalities.
My client had many requirements for the first delivery:
- The app should be a “white label” app: it could adapt to any hotel. Therefore logos, app colors, text, media, etc. should be loaded from the cloud.
- The app should have a login mechanism, with a username and a password. The username should be unique for each hotel room.
- The app should be multilanguage and multi-currencies.
- The app should run on both Android and iOS devices and considers horizontal and vertical formats.
- The app should download all the available media (images, texts, etc. ) after the user logs in.
- The server should handle a high volume of client connections.
Software architecture
Let’s begin 🚀
For the client, we need to build an app that can run on both Android and iOS. I chose to work with Unity3D, because of the flexibility it offers (Unity apps can run on Desktop, iOS, Android, WebGL, tvOS, PS4, and PS5) and my general knowledge of the platform.
For the server-side, we need a scalable architecture built on a cloud platform. I chose to work with Amazon Web Services (AWS), mainly because of the reliability of its scalable services and my experience with it.
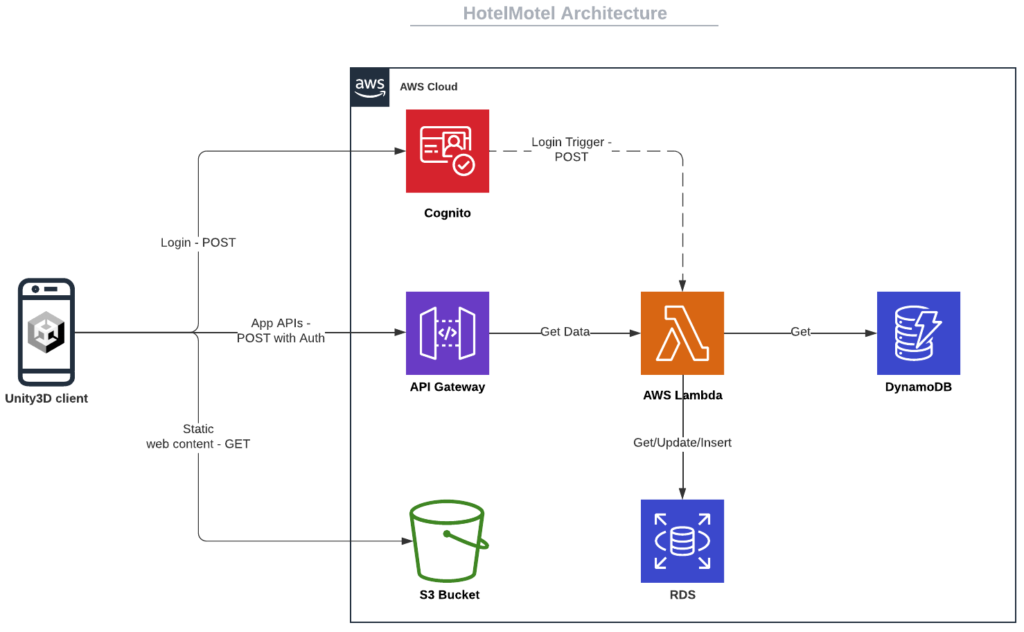
Here is the general architecture of our platform:
Note: I will not implement the AWS SDK; I prefer to maintain independence between client and server-side.
Server-side implementation
Cognito
The first Amazon service we use is Cognito. Cognito is like a strongbox where users, users’ attributes, and passwords are stored. It provides secure user authentication with usernames and passwords.
➡️ User pool: First we create a user pool with user name auth and self-registration disabled. Note that the User pool ID will be automatically generated.

➡️ App: During the User pool creation process, a User pool App will be created. We chose user password authentication as the only allowed authentication flow, and we create two custom attributes: hotel_name and room_number. Note that the App client ID will be automatically generated.

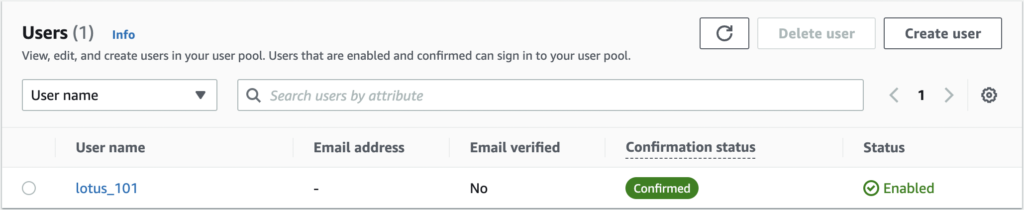
➡️ Users: We create the users manually within the User pool. The user name field is unique, so I set it as a concatenation of the hotel name and the room number.
RDS
RDS stands for Relational Database Service. In the relational database, we will store all the transactional information we need.
➡️ Database creation: First, we create a MySQL database with public access, and we set up credentials (database name, username, and password):

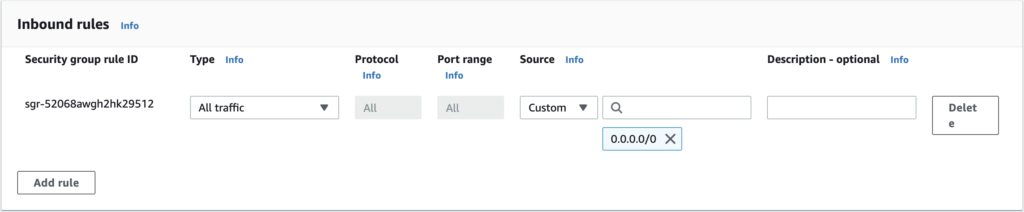
➡️ Security rules: Now we need to access the database to build the tables and fill them with data. I chose to do it with a desktop MySQL client: Sequel Pro. So, we need to allow external connections to our database: we enter the security group of our database and we change the inbound rules to allow all connections.
We can now connect to our database from the MySQL client with the credentials we set up during the database creation:

DynamoDB
DynamoDB is the no relational database service of AWS. We will store in it all the no transactional information we have like titles, descriptions, picture URLs, etc.
➡️ Table creation: We create a DynamoDB table. Our data will be segmented by the hotel so we chose this parameter as the Partition Key of the table.

➡️ Item creation: We create a new item containing our JSON data.

S3
S3 is a scalable storage service for static content, we use it to store pictures that will be shown on the pad.
➡️ Bucket: We create a new bucket aka repository. Since we store no sensitive media (pictures of hotels, menus, rooms, etc. can be found on the internet), we set the bucket and its content to “public”.

➡️ Bucket policy: We edit the bucket policy to allow bucket content only to be read.
Note: In our example above, the final URL of our repository would be: https://hotelmotelbucket.s3.amazonaws.com/
Lambda
Lambda is a great serverless service that allows running code letting Amazon manage server resources for you.
➡️ GetData function: This Lambda function will allow getting hotel data stored in DynamoDB. First, we create a new function from scratch running on the last version of Python provided by Lambda (3.9 for now).

Here is the function:
Notes:
- Thanks to the Authorizer we use, all the user information will be available in the event variable. We can get the value of the custom attribute
hotel_namewe defined in the user pool application. In our example, this value should be “lotus”. - We use boto3, the AWS SDK for Python, to call other AWS services in this case, DynamoDB. We use the
get_itemfunction to retrieve the data from the table “HotelMotel” with the key “lotus”. - Python native JSON library does not support Decimal type, so we create a
DecimalEncoderclass to cast Decimals to float. - We use the try/except clause to handle potential errors.
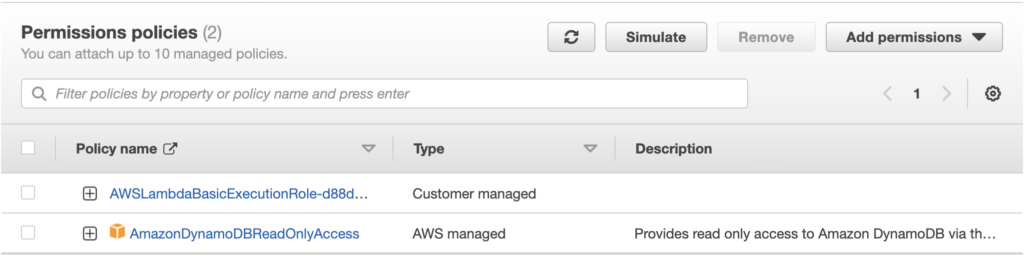
By default, Lambda functions do not have permission to read or write DynamoDB tables, so don’t forget to attach the AmazonDynamoDBReadOnlyAccess permission to the Lambda function we have just created.
➡️ OnLogged function: This Lambda function will allow saving a new user login in our relational database. This function will be called directly by Cognito as a trigger when a user logs successfully.
The table for saving login history in the relational database is the following:

To write in the relational database, we need first to make the connection with the PyMySQL library. Problem: PyMySQL is not a native Lambda library, so we have to create a new layer and we import PyMySQL into it. The layer could be reused for other functions.

Note: a clean version of PyMySQL can be found on PyPI.
We can now add the layer we have just created for our function:

And here is the function:
Notes:
- As described in the AWS documentation, the event object contains the user’s information like the username.
- We return the whole event object as described in the documentation.
Well, now back to Cognito. We create a new post-authentication trigger in our user pool, and we assign the lambda function we have just created:

API Gateway
The API Gateway service allows creating a secure entry point for our app and connecting it to the other AWS services we are using, in this case, Lambda.
➡️ API: We create a new REST API

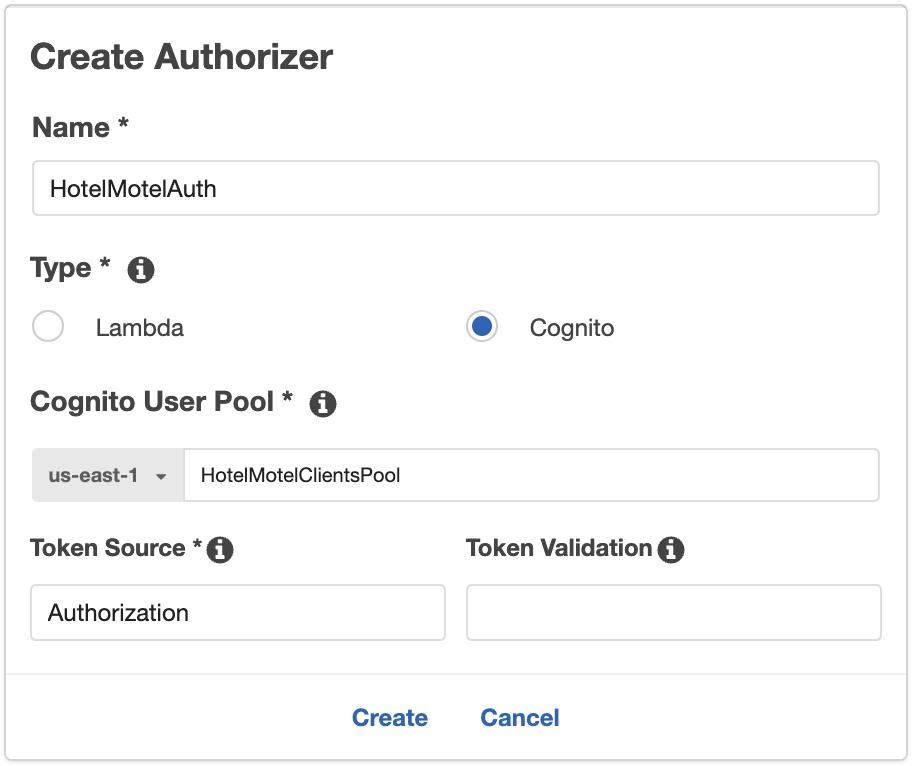
➡️ Authorizer: We create a new Authorizer to allow only users who belong to the user pool to call the API resources we will create.
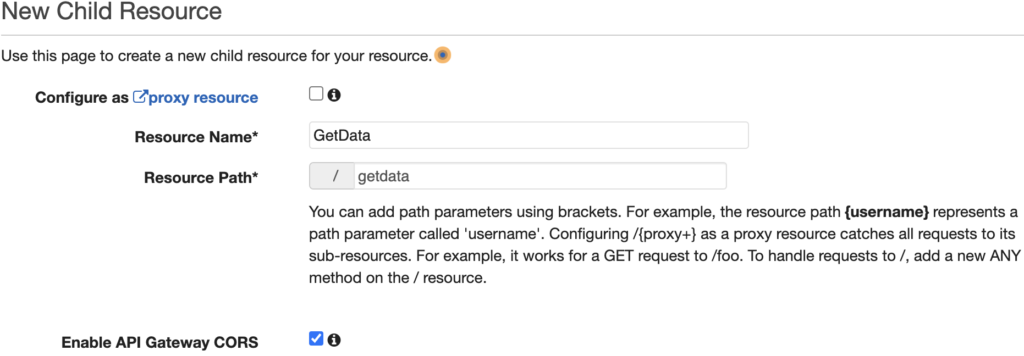
➡️ Resource: We create a new resource. The resource name will be a suffix of the final URL of the entry point.
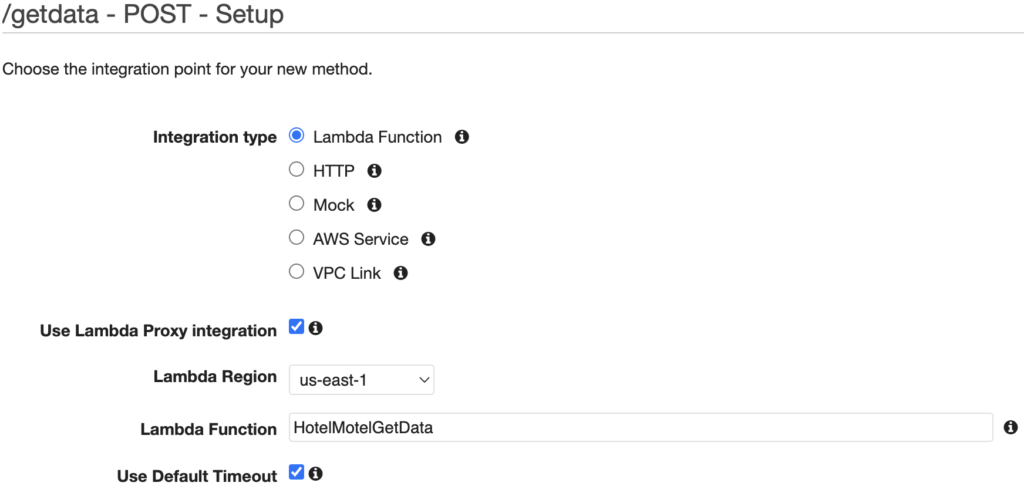
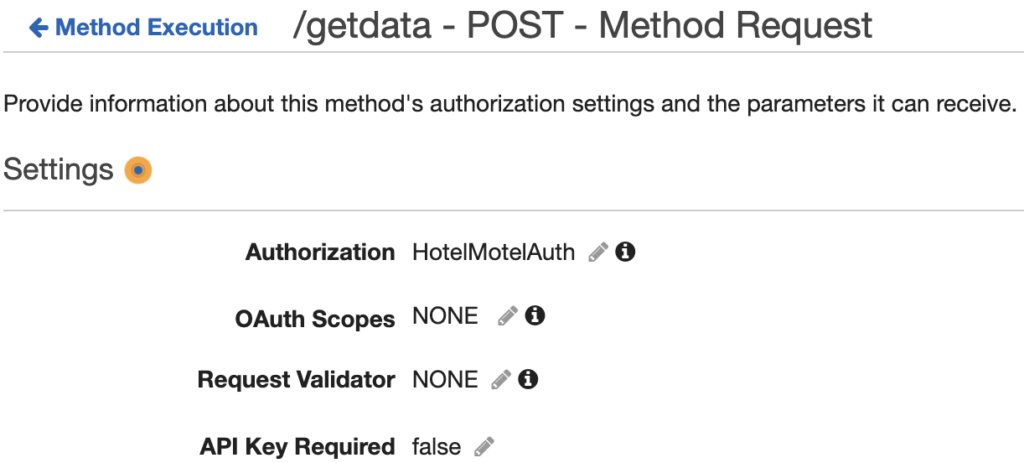
➡️ Method: We need to specify how the resource will be called, creating a new method. We create a POST method with Lambda integration, and we select the Python function we have previously written. Note that the Lambda Proxy integration should be activated to allow parameters to be sent from the Unity client.
In the method we have just created, we chose our Authorizer:
➡️ Deploy: Our API is ready, we just need to deploy it. We create a new stage, for example, “prod”.
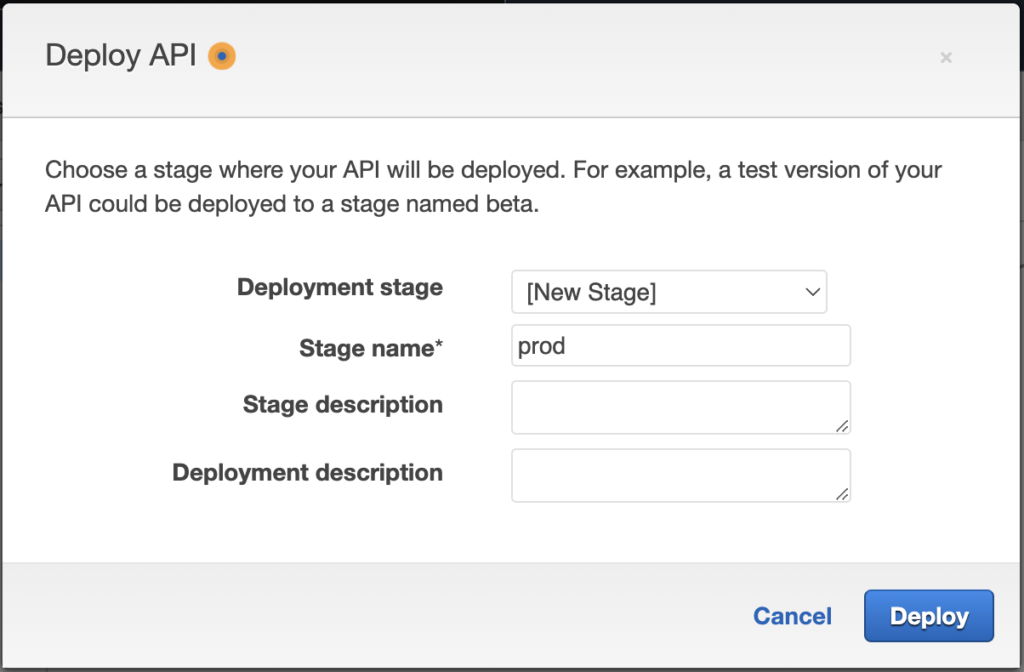
Our API has been deployed and is ready to use! Note that the URL that appears will be called by our Unity client.

Let’s try the get data function of our API with Postman:
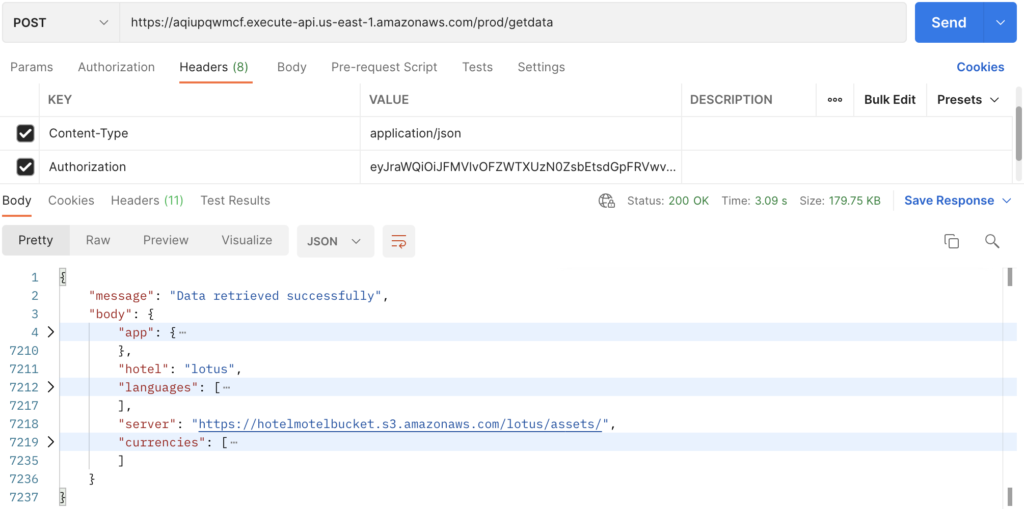
It works like a charm 🙌
UX/UI Design
Since I’m not a designer, I wondered how could I deliver a well-designed product, taking into account user experience, colors combinations, correct font size, etc. For a first delivery, I chose to work with a responsive HTML template: the Lotus Hotel template.
Well, I did not use the HTML code, I just replicated the mobile template design into Unity UI components (Canvas, Button, Image, etc. ).
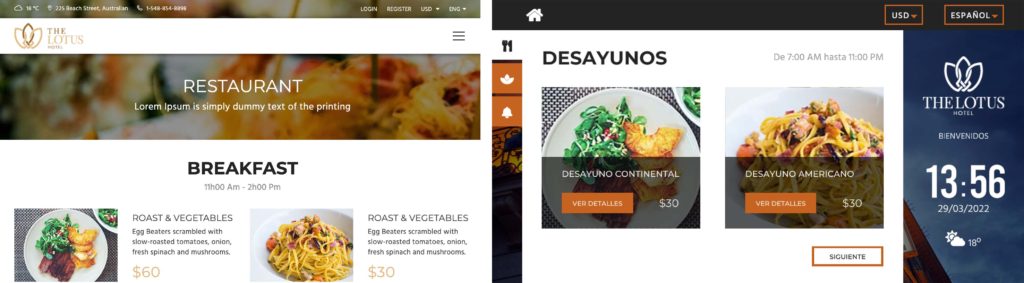
The template offers a large number of images and icons. By adding pictures from free images stock websites like Pixabay, I could have a great demo app.
Unity3D client
Login to Cognito
To perform a login to Cognito, we will perform a post request thanks to the UnityWebRequest class. Since we are working with JSON data, we use the ToJson function of the JsonUtility class to stringify our login parameters. In the same way, we use the FromJson function to parse response data.
First, we create the data classes following the structure described in the Cognito documentation and we use the Serializable attribute to deal with JsonUtility requirements:
Then, we call the Cognito service with the user parameters (username and password) to log in:
Notes:
UnityWebRequestclass works within a Coroutine.- The
ClientIdparameter is the App client ID generated by Cognito. - The login URL can be different if you have chosen another region creating your user pool (us-east-1).
- The Post function of UnityWebRequest does not support JSON strings and uses a strange HTML string encryption instead. A workaround is to do a weird trick with a byte array and a Put request. If you have a better solution in mind please let me know in the comments section.
- The request needs the Content-Type and X-Amz-Target headers to work properly.
- We will use the
IdTokenvalue returned by Cognito as the Authorization parameter in our GetData function.
Get Hotel Data
Since we have logged successfully to Cognito, we can now get the hotel data we need to show it on screen.
Notes:
- We use the URL of the entry point we deployed in API Gateway.
- We send the IdToken we received from Cognito as a request header.
Load Image from S3
We have logged and we get the data we need to show on the pad. We can now download the media from the repository we created on S3 (hotelmotelbucket).
Notes:
- We are working with UI components, so we use the UI Image class to show the pictures.
- We use the GetTexture function from the UnityWebRequestTexture class to download a picture from the repository.
- UnityWebRequestTexture class works within a Coroutine.
- We cast the incoming data with the DownloadHandlerTexture class to get a Texture2D object.
- We create UI Image sprite dynamically with the texture’s dimension.
Queuing and dequeuing tasks
The Unity3D app gets the whole data for the hotel after the user logs in and downloads the available media (picture of rooms, food, etc. ) from the repository. The problem is the following: there is a lot of media and the device where the app is running can not handle hundreds of simultaneous image downloads.
The workaround is creating a queue mechanism, using the C# Enqueue and Dequeue methods.
Notes:
- The queue we create is a queue of Coroutines: we enqueue and dequeue the
GetPicturefunction we created previously. - When a Coroutine is dequeued, the associated
GetPicturefunction is executed.
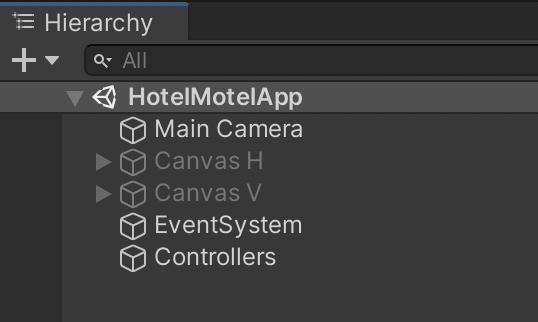
Horizontal and vertical formats support
We are working with responsive UI elements, but horizontal and vertical formats are too different from one another to be considered part of the same design, so we create two distinct Canvas, one for each format.
And we use the Screen class to show the adequate Canvas:
Bonus: clock system
The app contains a clock made with Text objects, here is the code:
Notes:
- We use the InvokeRepeating function to update the clock every minute and to tinkle the points every half second.
- We use the Now function of the DateTime class to retrieve the actual time of the device.
- Each digit is managed separately to have more control over it.
Closing thoughts
This article showed you how to build an entire scalable cloud architecture with Amazon Web Services, how to make those services interact, and how a Unity3D app can communicate with those cloud services.
Every code of this article has been tested using Unity 2020.3.17 and Visual Studio Community 2019. The mobile device I used to run the Unity app is a Galaxy Tab A7 Lite with Android 11.
All ids and tokens shown in this article are fake or expired, if you try to use them, you will not be able to establish any connections.
A special thanks to Gianca Chavest for designing the awesome illustrations.